Commands provided by the Home tab allow you to manipulate the current item as a whole, such as copying the item, changing its position in the content tree, or creating sub-items.

When selected, the Home tab displays a strip of seven chunks.
The Write Chunk
The Write chunk is always unfolded no matter which tab is activated and contains the Save button:
![]() Select to save changes to the currently selected item.
Select to save changes to the currently selected item.
The Edit Chunk
The Edit chunk contains the Edit button:
![]() Select Edit to lock the current item so that only you can edit it. If the button is disabled, this may mean that someone else has the item locked, or that you do not have Write access rights on the item. When you have obtained a lock on the item, the Edit chunk changes to display the Check In button.
Select Edit to lock the current item so that only you can edit it. If the button is disabled, this may mean that someone else has the item locked, or that you do not have Write access rights on the item. When you have obtained a lock on the item, the Edit chunk changes to display the Check In button.
 Select the Check In button to unlock the item so that other users may change it.
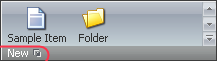
The New Chunk
The New chunk contains buttons for each of the types of sub-items that you can create under the current item. The list will vary depending on which item is selected. If many item types are available, you can scroll to see additional item types. Select the appropriate button to create a new sub-item of the corresponding type. For example, select the Sample Item button to create a new Sample Item as a sub-item of the selected item.
Select the box beside the New button to open a dialog (shown below) that allows you to assign additional sub-item types to the list available for the current item (this option is available for certain users depending on their access rights).
To assign an additional sub-item type to the current item, select the desired master in the left column, then click the right shift arrow or simply double-click the selected master. Once the master moves to the right column, click the OK button at the bottom of the dialog.
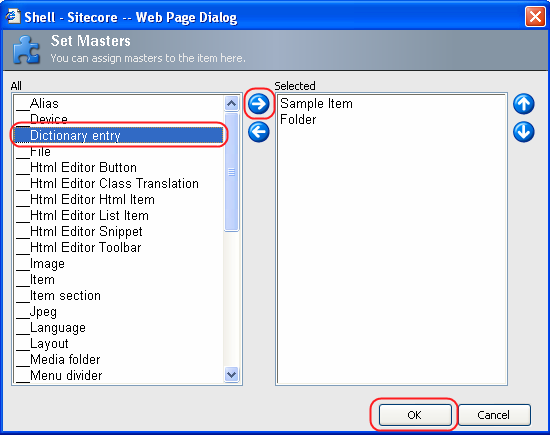
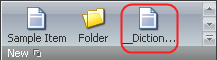
The newly added master will appear in the New chunk (see the screenshot below).
The Operations Chunk
The Operations chunk contains the Duplicate, Copy To, Move To and Delete buttons:
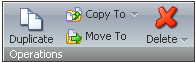
![]() Select to duplicate the currently selected item. The client will request a name for the duplicate item.
Select to duplicate the currently selected item. The client will request a name for the duplicate item.
 Select to copy the item to another location. The client will request a location for the copy.
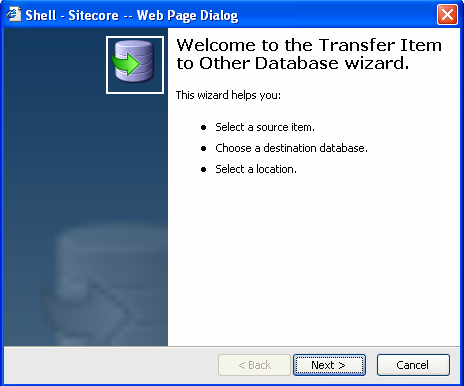
![]() Select the triangle beside the Copy To button to access the Transfer to Other Database command. Select the Transfer to Other Database command and the wizard will take you through the transfer process.
Select the triangle beside the Copy To button to access the Transfer to Other Database command. Select the Transfer to Other Database command and the wizard will take you through the transfer process.
![]() Select to move the Item to another location. Specify the desired location in the dialog which will appear.
Select to move the Item to another location. Specify the desired location in the dialog which will appear.
![]() Select to delete the current item.
Select to delete the current item.
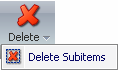 Select to delete sub-items.
The Clipboard Chunk
The Clipboard chunk contains the Paste, Cut and Copy buttons:
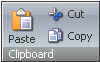
![]() Select to paste items from the Clipboard.
Select to paste items from the Clipboard.
![]() Select to cut the item and sub-items and put them on the Clipboard.
Select to cut the item and sub-items and put them on the Clipboard.
![]() Select to copy the item and sub-items and put them on the Clipboard.
Select to copy the item and sub-items and put them on the Clipboard.
The Rename Chunk
The Rename chunk contains the Rename and Display Name buttons:
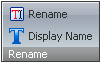
![]() Select to assign a new name to the item. This is the name that will be used in the URL required to select the item in the published web site.
Select to assign a new name to the item. This is the name that will be used in the URL required to select the item in the published web site.
![]() Select to assign a new language-dependent name to the item.
Select to assign a new language-dependent name to the item.
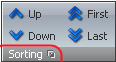
The Sorting Chunk
The Sorting chunk contains the Up, Down, First and Last buttons.
 Select the box beside the Sorting button to define how the sub-items of this item are sorted. In the Subitems Sorting dialog, select the desired sorting from the drop-down menu of the Sorting field and click the OK button.
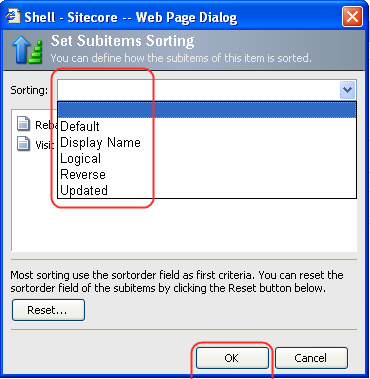
You can also reset the sortorder field of the sub-items by clicking the Reset button at the bottom of the Subitems Sorting dialog.
![]() Select to move the item before the previous item.
Select to move the item before the previous item.
![]() Select to move the item after the next item.
Select to move the item after the next item.
 Select to move the item first.
![]() Select to move the item last.
Select to move the item last.